Cedar Sense Articles
DIY Sauna Parts & Accessories: A Complete Guide
Building or upgrading your sauna should feel empowering, not confusing. If you already know the basics, this guide will help you choose the right components with confidence and assemble them correctly. We will walk through sauna parts & accessories in a clear, practical sequence so you can plan, buy, and install without costly mistakes.
You will learn how to select the correct heater size for your room volume, pick stones that hold heat evenly, and match controls to your power supply. We will cover wiring and ventilation fundamentals at an intermediate level, including clearances, cable gauges, and airflow targets. You will also compare bench layouts, door hardware, lighting options, and moisture seals, all chosen for durability and user comfort.
Expect checklists for compatibility, sourcing tips that separate certified components from lookalikes, and maintenance routines that extend service life. We will finish with troubleshooting for uneven heat, tripped breakers, and premature stone cracking. By the end, you will know exactly which parts to buy, how they fit together, and the standards that keep your sauna safe and efficient.
Understanding Sauna Parts & Accessories
Before you buy sauna parts & accessories, set yourself up for success.
- Prerequisites: measure the hot room in cubic feet, verify available amperage and breaker capacity, plan a fresh-air intake and exhaust, and choose indoor or outdoor placement.
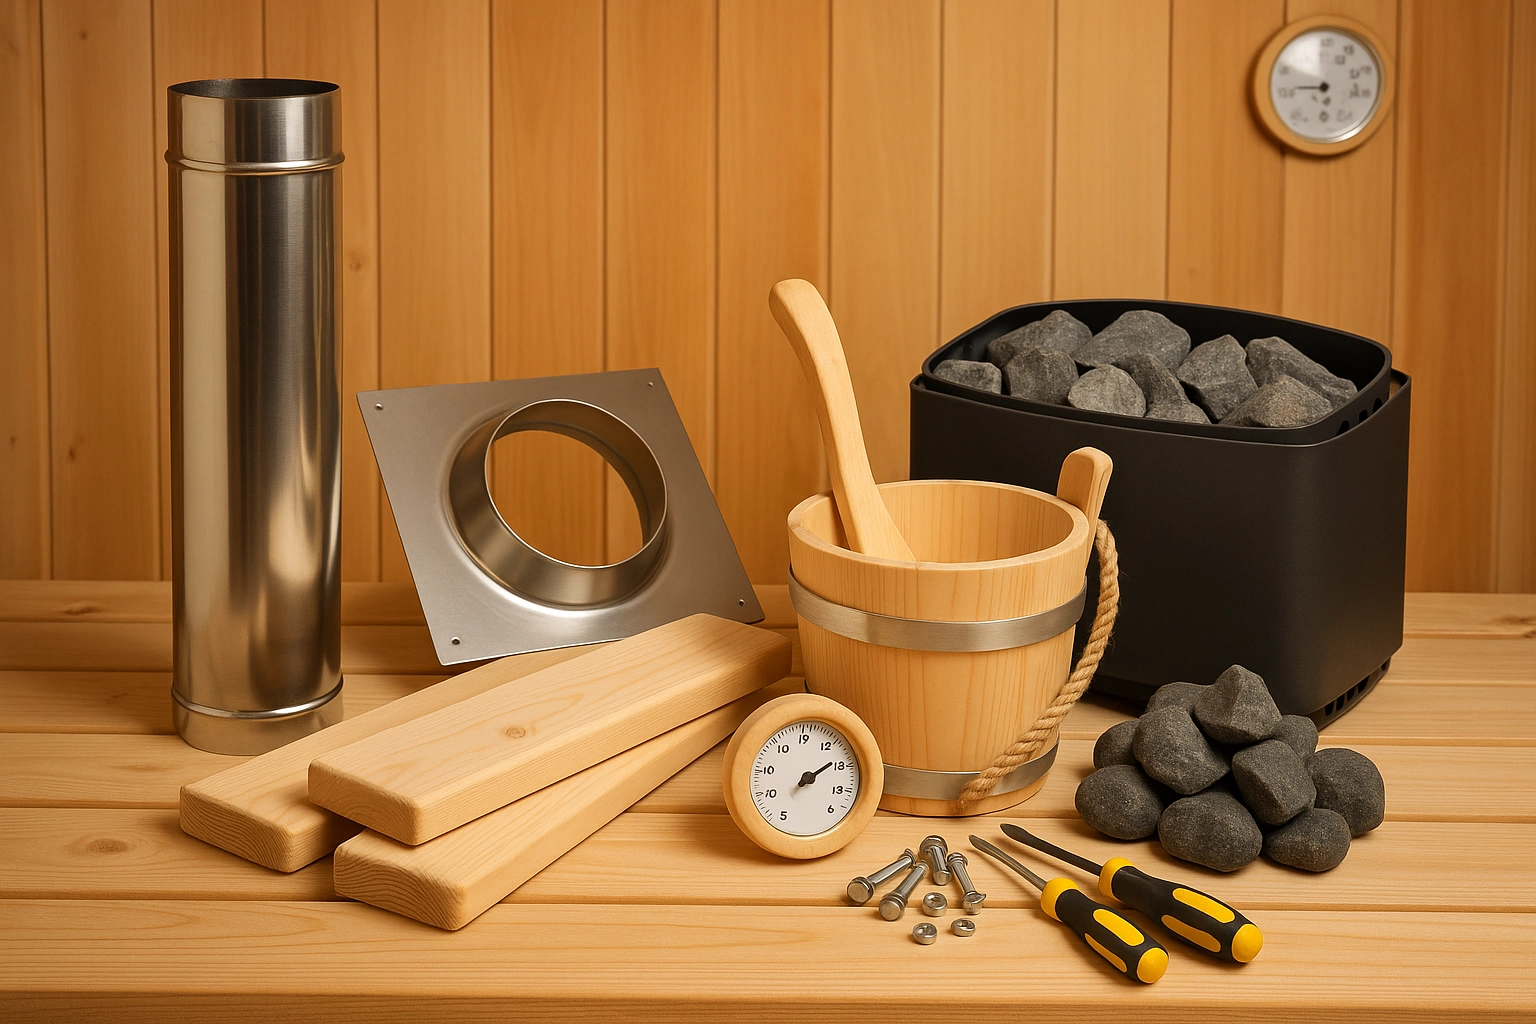
- Materials needed: heater or infrared panels, control panel, sauna stones, benches, backrests, shelves, heat-rated LED lighting, wiring, vapor barrier, and stainless fasteners.
- Expected outcomes: a safe, efficient build that delivers luxury wellness performance, supports resale value, and is DIY friendly.
- Specify core components. Right-size your heat source at roughly 1 kW per 45 to 50 cubic feet for traditional rooms, then choose electric, wood burning, or infrared based on site constraints. For fast warmups and energy efficiency in compact spaces, consider infrared panel kits. Pair the heater with a control system that offers preheat scheduling, child lock, and remote access; see this digital sauna controls guide for feature planning. Design ventilation with a low intake near the heater and a high exhaust opposite, which stabilizes oxygen and humidity for longer, more comfortable sessions.
- Add comfort and performance accessories. Ergonomic seating increases session time, so include contoured headrests and ergonomic sauna backrests. Install open shelves for towels and oils, plus a robe hook at the cool-down exit. Use heat-rated LED strips behind backrests for indirect glow, and consider the trending black finish on guards and fixtures to modernize rustic rooms. For hydrotherapy routines, stage buckets, ladles, and a floor grate that drains quickly between rounds.
- Choose materials and finishes. Western red cedar insulates well and resists decay, hemlock offers a light, uniform look, and thermally modified alder delivers stability with a refined dark tone. Avoid dense hardwoods that store heat uncomfortably, and leave hot-room wood unfinished to prevent off-gassing. Wipe benches after each use and deep clean monthly to preserve color. With the sauna accessories market projected to grow 9.6 percent annually from 2026 to 2033, these choices align with long-term value while elevating daily wellness.
Gathering the Necessary Materials
Start with a quality bill of materials
With your dimensions and electrical plan finalized, assemble a high quality bill of materials for a basic DIY sauna. 1. Structure: frame with kiln-dried 2x4s, insulate with mineral wool or fiberglass, then add a continuous foil vapor barrier per this DIY primer. 2. Interior: panel walls and ceilings in Western Red Cedar, build benches and backrests to match, and specify 1×4 or 1×6 tongue-and-groove with hidden fasteners, as outlined in this overview of cedar saunas. 3. Systems: choose a heater sized to room volume, install tempered glass or solid wood door, stainless or galvanized hardware, heat rated IP65 lighting, silicone-jacketed 90 C wiring, plus vents, controls, thermometer hygrometer, bucket and ladle, and headrests.
Why quality parts pay off
Quality parts and accessories protect against heat, moisture, and time, and they deliver measurable performance. In a market projected to grow at a 9.6 percent CAGR from 2026 to 2033, premium selections preserve value and minimize callbacks for DIYers and pros. Mineral wool retains R-value at high temperatures, foil vapor barriers limit moisture migration, stainless fasteners resist corrosion, and UL or CE listed heaters with proper overcurrent protection improve safety and efficiency. Expect faster heat up, tighter temperature bands, lower operating costs, and fewer replacements; curated DIY kits can also save 8 to 12 hours of sourcing and reduce compatibility errors.
Cedar, sustainable and beautiful
Cedar excels in saunas thanks to low density for thermal comfort, natural oils that resist rot and decay, and an aroma that elevates relaxation. Responsibly harvested cedar is a renewable resource, aligning with wellness and sustainability goals while providing decades of service with light maintenance. Visually, cedar’s warm hues and varied grain create a spa-grade interior that pairs elegantly with the 2026 trend toward black benches, stoves, and accessories, and complements rustic outdoor furniture. For best results, use clear cedar on touch points such as backrests and bench tops, knotty cedar on upper walls to balance cost, and allow ventilation gaps for even drying and longevity.
Step-by-Step Guide to Building Your DIY Sauna
Plan, design, and frame
With measurements and electrical planning complete, proceed from siting to finish. Step 1, choose location: indoor rooms need ventilation and moisture control, outdoor pads need a level base, drainage, and nearby power. Step 2, size and layout: a 6 x 8 foot hot room seats 4 to 6, keep ceilings at least 7 feet, and preplan door swing and heater clearances. Step 3 and 4, build the envelope and benches: frame 2x4s at 16 in OC, add mineral-wool insulation, a foil vapor barrier with air gap, cedar or hemlock cladding per verified DIY sauna designs, then set bench tiers near 20, 40, and 60 inches with smooth edges.
Install heaters and controls
Step 5, choose heat: electric offers precise control for most homes, wood burning suits off grid builds with proper chimney and spacing. Step 6, position and stone: mount per clearance tables, load washed stones loosely for airflow, and follow safe heater installation steps. Step 7, electrical and controls: hire a licensed electrician for a dedicated 240 volt circuit, mount the control at a reachable height outside or inside per model, never above the heater. Step 8, sensing and airflow: place the temperature sensor near the high point per manufacturer guidance, set a low intake near the heater and a high exhaust opposite, then test high limit safety and timers.
Indoor vs outdoor, finishing, and commissioning
Step 9, indoor specifics: seal penetrations, isolate HVAC returns, and add a water tolerant threshold or pan if you will steam the stones. Step 10, outdoor specifics: build on a drained pad, weatherproof the shell with overhangs, route conduit early, and confirm any permit requirements. Step 11, finish and accessorize: integrate heat rated lighting and on trend black sauna parts & accessories, a smart upgrade as accessories are projected to grow about 9.6 percent CAGR from 2026 to 2033. Expected outcome: a hot room that reaches 170 to 190 degrees Fahrenheit in 30 to 45 minutes with even airflow and responsive controls, ready to pair with premium cold tubs or hot tubs.
Enhancing Your Sauna Experience with Accessories
Prerequisites and materials
With your hot room sized and electrical plan verified, accessories are the fastest way to elevate safety and comfort. Targeted upgrades also build long term value, aligned with luxury wellness demand projected to grow at a 9.6% CAGR through 2033. Gather heat tolerant towel hooks, a combined thermometer hygrometer, a 15 minute timer, essential oils, and ergonomic back or headrests. Favor cedar or thermo aspen, plus stainless or black anodized hardware to match 2026’s black equipment trend.
- Outfit the essentials. Mount two to four towel hooks outside the door and one inside at eye level, anchored into studs. Install a combined thermometer hygrometer at shoulder height opposite the heater, then verify accuracy during first heat up using an ice and boiling water check. Choose a reliable 15 minute hourglass to cap rounds and prevent overexposure, and review durable thermometer hygrometer options alongside purpose built sauna sand timers.
- Integrate aromatherapy for relaxation. Start with eucalyptus or lavender at 1 to 3 drops per ladle on stones, or use a carrier cup in infrared to avoid residue. Always pre mix oils in water and never apply directly to the heater or skin to prevent hotspots. For even distribution and hands off consistency, consider programmable diffusion systems, and see these sauna technology innovations.
- Prioritize ergonomic comfort. Add contoured backrests that follow the spine’s S curve and headrests that keep the cervical angle neutral, then test bench height for knee comfort. Target a bench depth of 18 to 24 inches and a backrest tilt of roughly 95 to 110 degrees for relaxed posture during longer rounds. Choose smooth, low resin woods like thermo aspen or Western Red Cedar, and consider a lightweight leg rest or portable sauna chair for users who favor lower benches.
Next, commission controls and your heater settings.
Troubleshooting Common Sauna Setup Issues
Troubleshooting a new build is mostly about airflow, moisture, and load. The most common issues we see in DIY rooms are heat stratification, slow heat-up, condensation on ceilings, tripped breakers, and wood movement. These problems usually trace back to heater placement, vent geometry, vapor barrier continuity, and undersized electrical supply. With luxury wellness on the rise in 2026 and a projected 9.6 percent CAGR for accessories through 2033, dialing in performance protects your investment and elevates the experience. Use the steps below to isolate faults quickly, then decide whether to fine tune yourself or bring in a pro.
Prerequisites and tools
Have an infrared thermometer, hygrometer, smoke pencil, clamp meter, straightedge, high temperature silicone, foil tape, and 120-grit sanding block. Pre-heat the room for 30 minutes so measurements reflect steady state. Document bench, floor, and ceiling temperatures, humidity, and current draw. Expected outcome is even heat, dry surfaces after sessions, correct amperage on a dedicated circuit, and stable woodwork. Keep spare mineral wool, vent grilles, and deflectors from your sauna parts & accessories kit for quick adjustments.
- Heat distribution. Map temperatures from floor to ceiling and across benches. Aim for less than a 15 to 20 degree Fahrenheit difference between upper bench and footwell. If higher, verify heater clearances per manual, add a low intake near the heater and a high exhaust diagonally opposite, and use adjustable grilles to achieve roughly 2 to 4 air changes per hour. Install simple baffles under benches to guide convection.
- Moisture control. Use a smoke pencil to find vapor leaks, then patch with foil tape and silicone at penetrations. Ceilings should shed fine droplets, not drip; if dripping, add insulation or a slight ceiling crown. After sessions, run a 20 minute dry-out with the door cracked and towels removed.
- Electrical safety. If breakers trip or heat-up lags, confirm a dedicated circuit sized for the heater and correct wire gauge with a clamp meter. Only a licensed electrician should service panels and GFCI protection.
- Wood movement and comfort. Leave 0.25 inch expansion gaps at panel terminations and tighten stainless fasteners. Lightly sand sap or water marks and keep interiors unfinished. Dark or black accessories trend well, but place protectors and towels where surfaces run hotter.
If cold spots persist, condensation forms after 30 minutes of use, or nuisance trips continue, engage a specialist. Our team can package a custom kit and coordinate install, or you can work with experienced regional pros like San Francisco Custom Saunas or Detroit Custom Saunas. Professionally tuned systems save energy and maximize longevity. Once performance is stable, you can confidently layer premium accessories for a luxury-grade experience.
Wellness Rituals: Getting the Most from Your Sauna
Integrate breathwork and meditation inside the hot room
Your sauna is more than heat, it is a controlled environment to train the nervous system. Use breathwork to shift from sympathetic drive to calm, parasympathetic dominance. Start with box breathing, inhale for 4 seconds, hold for 4, exhale for 4, hold for 4, repeating for 3 to 5 minutes while seated with a straight spine. For a deeper reset, try 4-7-8 breathing or a gentle body scan meditation that follows sensations from crown to toes. Pairing heat with mindfulness supports relaxation, improves focus, and helps you tolerate higher thermal load comfortably. Keep conversations off and use a sand timer or smart timer to avoid clock-checking, which breaks immersion.
Add contrast for amplified benefits
Contrast therapy alternates vasodilation in heat with vasoconstriction in cold, which functions like a circulatory pump. Expect faster recovery and lower next-day muscle soreness, since cold exposure can reduce inflammation and help clear metabolic byproducts. Brief immersion also stimulates norepinephrine and endorphins, which many users report as sharper mental clarity and elevated mood. Two to three rounds often outperform a single cycle for intermediate users, provided exposures are precise rather than prolonged. The luxury wellness category is expanding, and sauna accessories are projected to grow at a 9.6 percent CAGR from 2026 to 2033, so adding a dedicated cold plunge or contrast-ready outdoor shower is a long-term investment. Recent major factory investments in sauna manufacturing further validate this growth trajectory.
Prerequisites
- Medical clearance if you have cardiovascular, respiratory, or metabolic conditions. Hydrate, avoid alcohol, and set a cool-down zone.
Materials
- Thermometer, timer, bucket and ladle, backrest, towel, electrolyte water, essential oils, heart rate monitor. Cold tub or outdoor shower, non-slip mat, and optional black-finish accessories to match current design trends.
Step-by-step ritual for mental and physical gains
- Pre-heat sauna to 170 to 195 F for traditional, or 120 to 150 F for infrared; set timer and music-free environment.
- Heat, 10 to 15 minutes, practice box or 4-7-8 breathing, finish with a 2-minute body scan.
- Cold plunge, 1 to 2 minutes, keep breathing steady through the first 30 seconds.
- Neutral rest, 5 to 10 minutes at room temperature, add gentle mobility or gratitude journaling.
- Repeat 2 to 3 rounds based on experience, stop if lightheaded.
- Recover, rehydrate with electrolytes, and log sleep and mood to track progress.
Expect calmer evenings, better perceived recovery, and improved focus over 2 to 4 weeks. Place your cold station within a few steps of the hot room to maintain repeatable cycles. If you are DIYing a sauna kit, pre-plan plumbing and drainage for a cold tub or shower, and consider durable outdoor furniture to create a serene reset zone. Curated accessories make rituals consistent, and consistency is what compounds results.
Conclusion: The Journey to a Personalized Sauna Retreat
The journey from plan to personalized sauna retreat follows a deliberate sequence that rewards careful setup. Prerequisites include verified cubic footage, dedicated amperage, balanced intake and exhaust, and a simple moisture path. With that confirmed, assemble matched materials, a sized heater or infrared array, insulation, foil vapor barrier, kiln dried framing, untreated paneling, benches, a tight door, low voltage lighting, and a reliable control. Proceed in order, 1. site and design with ventilation and a level outdoor pad, 2. frame, wire, insulate, seal, and panel, 3. install heater, guards, benches, and controls with safe clearances, 4. commission and heat soak, calibrate sensors, and test shutoffs, yielding even heat and typical warmups of 15 to 25 minutes for infrared or 30 to 45 for traditional.
Premium sauna parts & accessories turn heat into ritual and long term value, and the category is expanding with a projected 9.6 percent CAGR from 2026 to 2033. Start with essentials for comfort and safety, thermometer hygrometer, backrests, bucket and ladle, heat rated mats, and adjustable vents for fine tuning. Then add luxury, black accents, ergonomic headrests, under bench lighting, aromatherapy diffusers, and a contrast station, cold tub or outdoor shower, to multiply recovery and performance. Commit to a weekly rhythm, two to four rounds of 10 to 15 minutes with cool downs, three days weekly, and you will build cardiovascular conditioning, better sleep, and a home spa that scales from DIY kits to premium retreats.